
With many useful tools, QuickBooks is known for its strong accounting capabilities, which make it easy for professionals to manage their accounts. However, despite its popularity and advanced technology, users sometimes encounter annoying issues. “QuickBooks Migration Failed Unexpectedly” is an issue that appears when you try to move files from one place to another.
We’ll discuss the cause of this problem and provide some solutions in this article. We’ll also look at the QuickBooks Migrator Tool, which might be in big help if you are having trouble with this. The “QuickBooks Migration Failed Unexpectedly Windows 11” problem may be affecting you. QuickBooks is known for its strong accounting features and abundance of useful tools, which make it simple for experts to handle their accounts. But even with its advanced technology and widespread use, customers sometimes run into bothersome problems. The common error message “QuickBooks Migration Failed Unexpectedly” shows up when you attempt to move files from one location to another.
In this article, we’ll talk about the causes of this problem and offer possible solutions. We’ll also look at the QuickBooks Migrator Tool, which could be quite helpful if you’re experiencing issues with this. You might be affected by the “QuickBooks Migration Failed Unexpectedly Windows 11” issue.
What is QuickBooks Migration Tool?
The QuickBooks Migration Tool, sometimes known as the “Migrator Tool,” was introduced with QuickBooks Desktop 2019. This tool represents a big step forward in user convenience. It makes it simple to move your three most recent company files and the QuickBooks Desktop Pro program to a new computer. This tool’s development shows Intuit’s commitment to simplifying data transfer so you can update your computer without worrying about the stress of manual data transfer.
What are the Prerequisites or Minimum System Requirements?
You may get the infamous “QuickBooks Migration Failed Unexpectedly” error if your system don’t meet the minimum system requirements for the QuickBooks Migration Tool. Before continuing, make sure your system meets these minimum requirements.
- QuickBooks Version: From QuickBooks Desktop Pro 2019 onwards the tool is available.
- User Rights: You need to be logged in as an admin user in order to use the Migrator Tool.
- Internet Connection: QuickBooks Desktop Pro must be installed on a computer with an active internet connection.
- USB Flash Drive: A flash drive that has sufficient storage space to transfer the needed QuickBooks files. Guidances on the exact amount of storage space required for the migration process is given by the Migrator Tool.
What are the Limitations of the QuickBooks Migration Tool?
The QuickBooks Migration Tool has several restrictions that you should be aware of, despite its great helpfulness. Although it’s meant to make the migration process easier, there are certain things it can’t handle, so you might have to put in a little more work to make sure your new computer is fully configured.
- Selective File Transfer: Just the last three company files that were opened recently are transferred by the tool. Backup data and older company files are not moved.
- Incomplete Setup Transfers: No payroll and payment setup information, no Intuit Data Protect information, and no multi-user setup data are transferred by the Migrator Tool. On the new computer, these settings need to be manually configured.
- Manual Reference: All data stays on the original computer even when the tool doesn’t cop some of it to the new one. Users are able to review it as needed.
Download and use the QuickBooks Migration tool
The methods to download and use the QuickBooks Migration Tool are as follows:
- Visit the QuickBooks website and sign in using your credentials.
- Click the “Download” button to start the QuickBooks Migration Tool download.
- To install the tool, save the installation file to your computer and run it.
- From the desktop shortcut or Start menu on your computer, open the QuickBooks Migration Tool.
- To move data across QuickBooks company files, simply follow the on-screen directions. This could involve mapping the data fields and choosing the source and destination files.
- The tool will generate a report showing the success or failure of the migration after the procedure is finished.
- Check the transferred data for accuracy and make any required corrections.
Note: To guarantee that your data is protected if any errors or problems, it is advised that you make a backup of your QuickBooks company file before beginning the migration process.
What Should You Do If “QuickBooks Migration Failed Unexpectedly” or the Tool Doesn’t Work?
The QuickBooks migration program help the easy transfer of company files and data across Windows and Mac operating systems. However, the tool won’t be able to carry out further actions if it fails or the move.quickbooks.bat file gets corrupted. Users may get the error message “QuickBooks Migration Failed Unexpectedly on Windows 11” in such cases.
If the QuickBooks Migration Tool malfunctions or isn’t working correctly, use these troubleshooting steps to fix the problem:
- Check for compatibility:Verify that the source and destination QuickBooks files are compatible with the Migration Tool by running a compatibility check. The utility may not work correctly if the files are not in the correct version or format.
- Check the data size: If the data file is too big, the migration may not succeed. Think about dividing the data into manageable portions and transferring each one separately.
- Check the internet connection: The “QuickBooks Migration Failed Unexpectedly” problem may be caused by a sluggish or erratic internet connection. Prior to starting the migration procedure, make sure your internet connection is steady.
- Reinstall the Migration Tool: Try uninstalling the Migration Tool and then reinstalling it if problems with the software continue.
- Use an alternative method: Try manually migrating the data by exporting it from the source file and importing it into the destination file if the Migration Tool is still not working.
Follow these steps to manually migrate your QuickBooks company data from one system to another:
- Backup the source company file: Make a backup copy of your source company file so that you have a copy of your data in case something goes wrong during the transfer process.
- Export the source data: In QuickBooks, go to “File” > “Utilities” > “Export”. Choose “Export” and then the “IIF (Intuit Interchange Format)” option. Save the exported file on your PC.
- Install QuickBooks on the destination system: If QuickBooks is not already installed on the destination system, download and install the correct version.
- Import the exported data: In QuickBooks on the destination system, navigate to “File” > “Utilities” > “Import”. Select “Import” and then “IIF (Intuit Interchange Format)”. Locate and pick the exported file you saved in Step 2.
- Map the data fields: During the import process, you will be required to map the data fields from the exported file to their corresponding fields in QuickBooks. Make sure to match each field exactly to guarantee that your data is imported correctly.
- Verify the imported data: Once the import process is complete, go through the data in QuickBooks to ensure that everything was imported correctly.
Note: Manual transfer may take longer than using the QuickBooks transfer Tool, and there is a greater risk of data loss or inaccuracies. It is suggested that you carefully follow the steps and contact QuickBooks support if you need help.
What Steps Should You Take If Both the Migrator Tool and Manual Method Fail?
If you continue to encounter problems after using both the migrator tool and manual approaches, your first step should be to uncover the underlying causes of the problem. Once identified, you can proceed slowly through each troubleshooting strategy to discover the most effective remedy.
Unraveling the Mystery – Why Does “QuickBooks Migration Fail Unexpectedly” on Windows 11?
Getting the “QuickBooks Migration Tool Not Working” problem might be a difficult challenge. To clarify, we look at the most common factors that could be generating this snag:
- Incompatibility with the Operating System: The root of the problem is generally an operating system that is out of date or incompatible with your QuickBooks Desktop (QBD) edition. It is critical to ensure that your operating system and QBD version are compatible.
- Corrupted System Files: Corrupted files lying within your operating system can occasionally disrupt QBD’s seamless performance. These hidden gremlins might cause havoc during your migrating process.
- Damaged migrating Service Files: Essential files required for the migrating process may have been corrupted or accidentally destroyed. These files are the unsung heroes of successful migrations, and their integrity is critical.
- Restrictive Permissions for QuickBooks Folder: Inadequate permissions for the QuickBooks folder on your host or server computer can be a problem. This can serve as an unintentiona gatekeeper, impeding the migration process.
- Outdated or faulty QuickBooks Database Server Manager: A broken or out-of-date QuickBooks Database Server Manager is a common factor that goes unnoticed. Keeping this instrument in top shape is critical for a smooth migration.
- Interference from Third-Party Software: External software, particularly security applications or firewalls, may be too protective, obstructing QuickBooks processes. Adjusting these settings could be the key to solving the problem.
Understanding the underlying reason is the first step in troubleshooting this problem. Once identified, the path to a solution becomes clearer and more manageable.
Quick Solutions to Fix QuickBooks Migration Failed Unexpectedly in Windows
The “QuickBooks Migration Failed Unexpectedly” error occurs more frequently in Windows 10 and 11 than in any other operating system. As a result, we’ve developed a list of some of the most successful ways to resolve the “QuickBooks Migration Tool Not Working” or migration failure issue. However, for the greatest results, follow the procedures in the order specified.
Solution 1: Restore to an old version of the windows (previous in this case)
Solution 1: Revert to a Previous Version of Windows
If you are having problems, reverting to an earlier version of Windows can help. Here’s how you can do it:
- Click the Windows icon, and then you have to choose ‘Settings’.
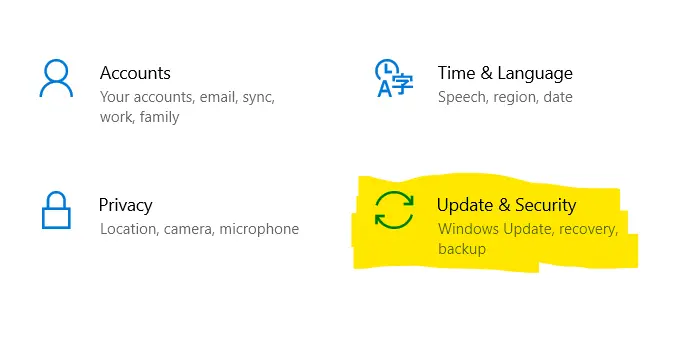
- Once under Settings, find and click on ‘Update & Security’.
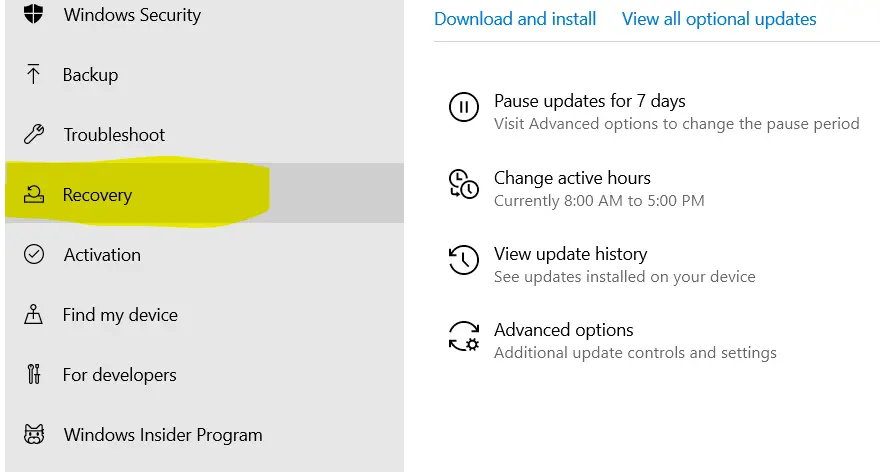
- In the sidebar on the left, select the ‘Recovery’ tab.
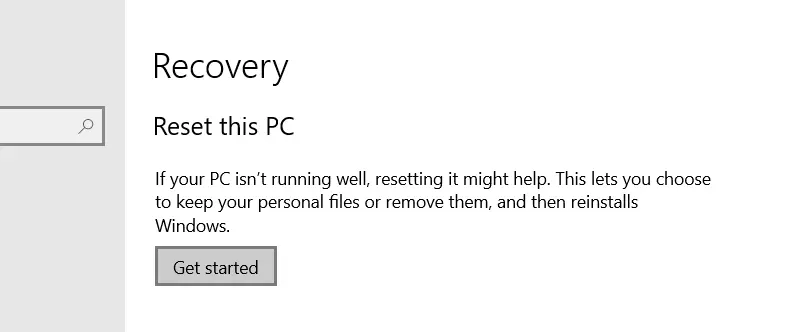
- Among the options offered, find ‘Go back to an earlier build’. To begin the process, click the ‘Get Started’ button below this choice.
After reverting to an earlier Windows version, reinstall QuickBooks Desktop (QBD) and verify that the migration tool works as intended.
Solution 2: Troubleshoot the compatibility issues with QuickBooks
If you have recently updated or rolled back to an earlier release of Windows, you may be experiencing compatibility issues with the migration tool or QuickBooks itself.
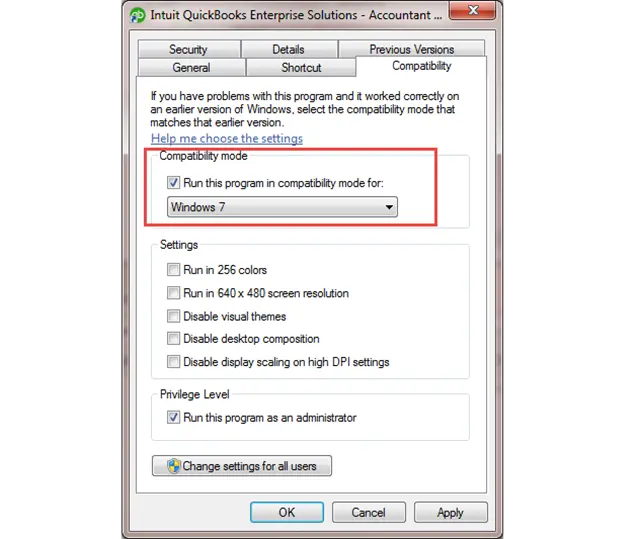
- Go to QuickBooks, right-click it, and select “open file location” from the list of options.
- Next, right-click on the QB file and select “properties”.
- From the properties dialog box, select the “compatibility” tab. Now, choose the Windows version from the “Run the program in compatibility mode for” selection.
- Then you have to click on Apply and then you have to click on OK.
Run App Compatibility Troubleshooter
- Open the Control Panel and select Programs and Features from the list of control items.
- Now, click “Run programs made for previous versions of Windows” to launch the “Windows Program Compatibility Troubleshooter”.
- Click Next or the Advanced button, and then select QuickBooks from the list of programs displayed.
- The troubleshooter will run and generate a list of the application’s issues.
- To resolve the faults or issues, click the next button.
Solution 3: Update windows
You may not be using the correct Windows version for QuickBooks. Follow these simple steps to upgrade Windows successfully.
- To install the updates, go to Start > Settings > Update and Security > Windows Update, and then select ‘check for updates’. If you see the updates, install them.
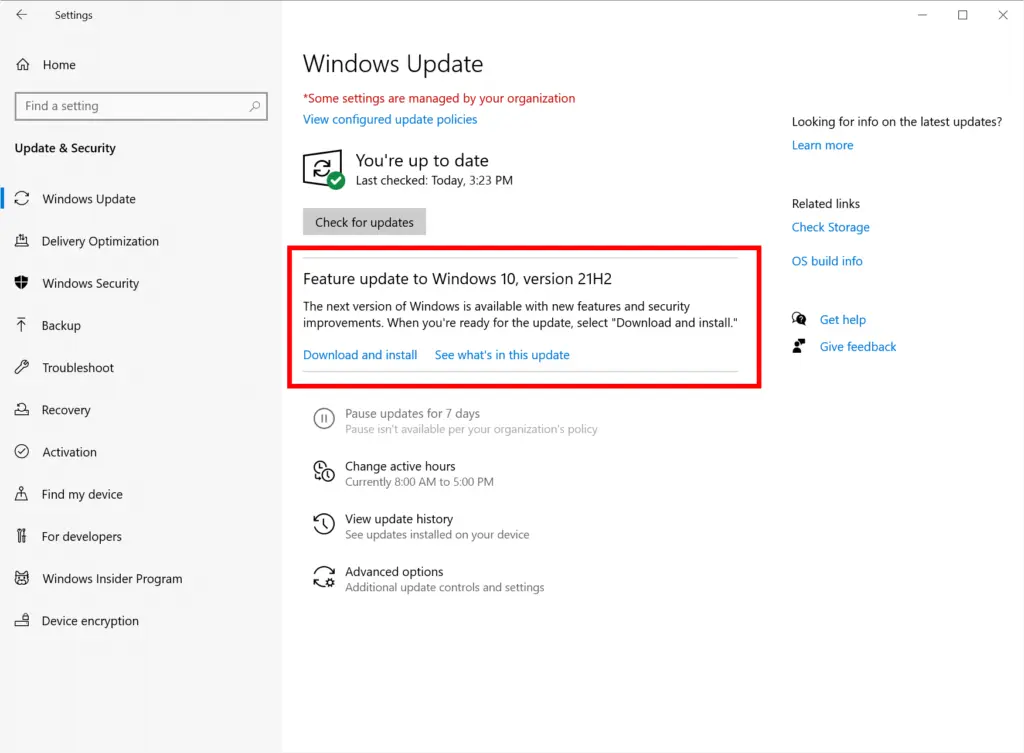
- If you do not receive the 21h2 version automatically, use the Windows upgrade Assistant to do a manual upgrade.
- If you’re constantly having problems upgrading your device, check out this blog post on how to troubleshoot Windows updates. This process may restore QuickBooks functionality and allow you to move your data.
Solution 4: Uninstalling Third-party Backup Applications
If you suspect a third-party app is interfering with the QuickBooks Desktop Migration, take the following actions to uninstall it:
Accessing Preferences:
- You have to open the QuickBooks Desktop as an Administrator user.
- Then you have to go to the “Edit” menu at the top of the screen.
- Select “Preferences” from the dropdown menu. This step will bring up the Preferences Window.
Navigating to Integrated Applications:
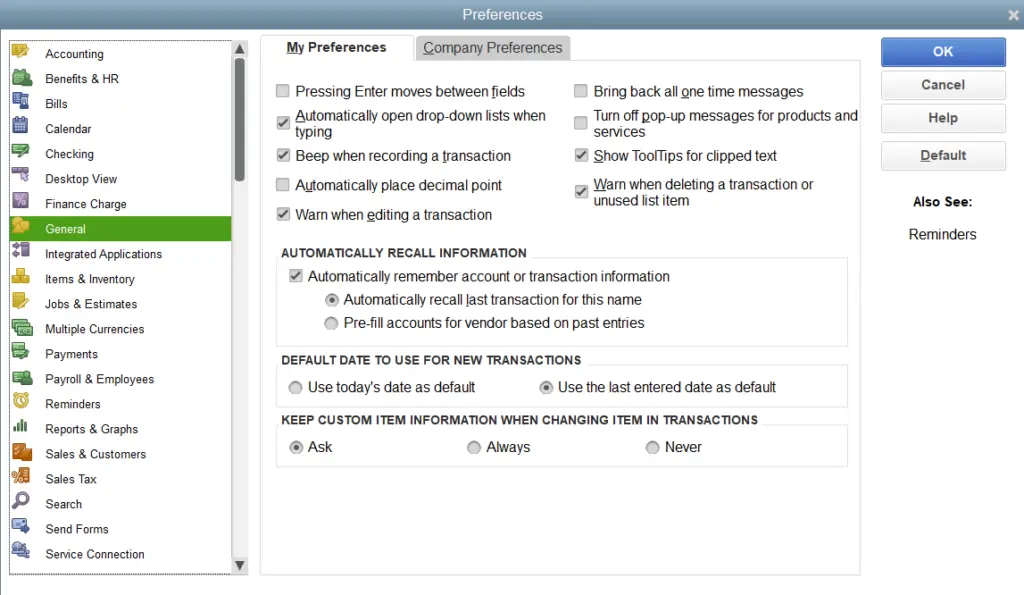
- The Preferences window has a list on the left side. From this option, choose “Integrated Applications.”
Adjusting Company Preferences Settings:
- Once you are in the Integrated Applications settings, select the “Company Preferences” option. Here is a list of all QuickBooks-integrated programs.
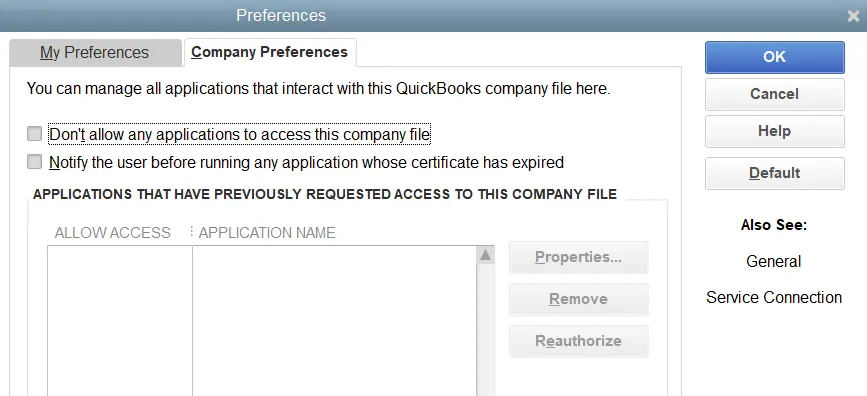
Remove Third-Party Applications:
- Find the third-party program that you want to disconnect from QuickBooks.
- Uncheck the box next to the name. Doing so prevents the application from connecting to QuickBooks and accessing your company’s information.
Following these steps make sure that no external apps interfere with the QuickBooks transfer process.
Solution 5: Uninstall pending QBDT maintenance release update
Before you begin these steps, save all of your pending work and close the QuickBooks software.
- The ‘Download Location’ provided on the ‘Options tab’ of the Update QuickBooks Desktop window can be accessed via the following Windows path. (Keep in mind that the “Program Data” directory is hidden; to find it, you must enable Windows to show hidden files and folders.)
- Once you have arrived at the Download Location directory, locate the “EPatch” and “NewFeatures” directories. These should have current dates that correspond to the time when QuickBooks downloaded the removed update.

- Follow these steps after opening the EPatch Directory:
- When the directory is open, you have to click “Select all” to highlight the whole contents.
- Select “Delete” while the directory’s entire contents are highlighted to eliminate everything, and then close the directory.
- Open the NewFeatures Directory and repeat the two steps we described earlier in the EPatch Directory.
- Now that the maintenance release update has been uninstalled, you can close Windows Explorer.
Solution 6: Update Your QuickBooks Desktop Program
If you are having migration problems when transferring QuickBooks Desktop from one computer to another, it could be due to outdated software. We have noticed that skipping regular updates can lead to similar issues. To upgrade QuickBooks Desktop, we strongly recommend that you follow the instructions outlined below.
- Begin by going to the “Help” section of QuickBooks and then pick “Update QuickBooks” Desktop.
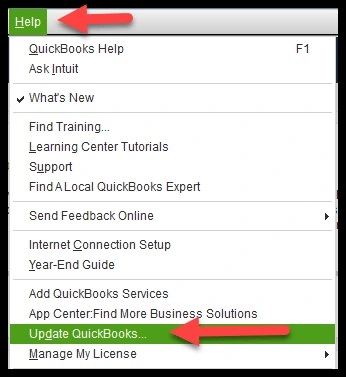
- Select “Update Now” and then “Get Updates”.
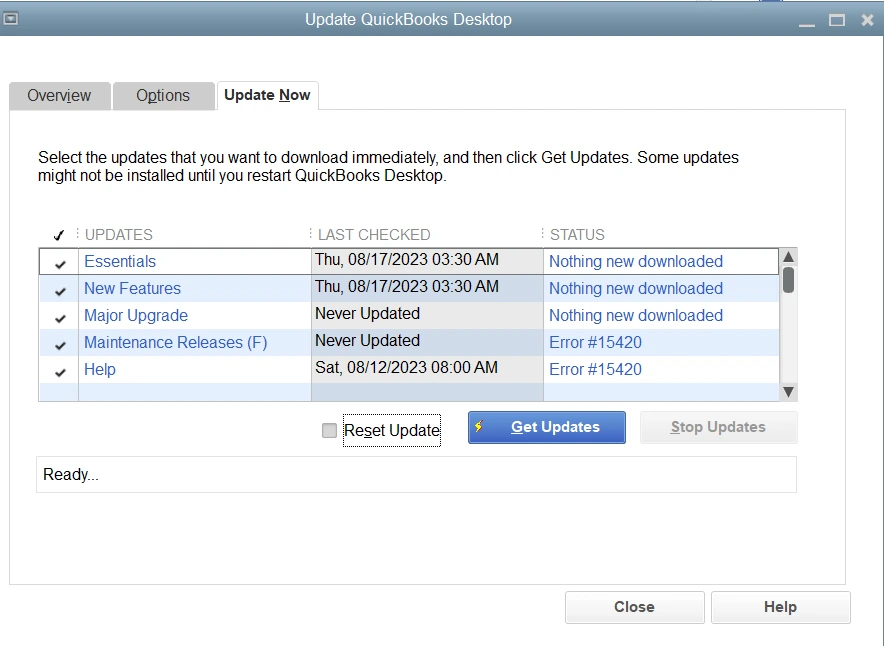
- Now, close and reopen QuickBooks, install any necessary updates and restart your computer after the installation is complete.
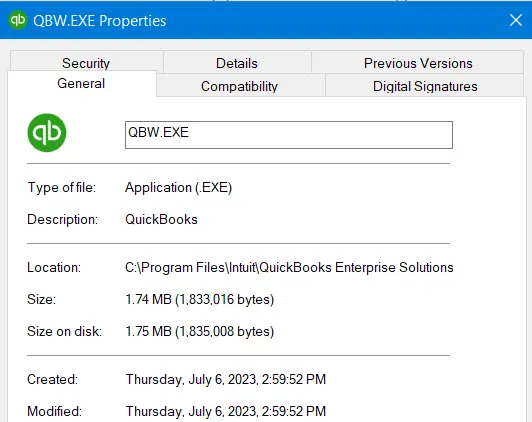
If you face the ‘QuickBooks Migration Failed Unexpectedly’ error, try the preceding steps again. If the problem persists, try stopping the following processes: QBW32.exe, QBW.exe, QBCFMonitorService.exe, qbupdate.exe, QBDBMgr.exe, QBDBMgrN.exe, and QBMapi32.exe. Once completed, restart QuickBooks.
Solution 7: The migration service file gets corrupted or deleted
The move.quickbooks.bat file is responsible for the QBD migration program running smoothly. If this file is corrupted, damaged, or deleted accidentally, the tool will not operate and you will be unable to migrate the company file.
You cannot create an important service file. The only way to resolve this issue is to remove and reinstall QuickBooks.
Solutions for QuickBooks Migration Failed Unexpectedly in MAC
“QuickBooks Migration Failed” is an uncommon error on macOS. However, we have discovered five solutions. We are convinced that these solutions will properly resolve the “QuickBooks Migration Failed Unexpectedly” issue on Mac.
Solution 1: Verify System Requirements
- Check that your Mac operating system is compatible with the QuickBooks version you are using.
- Make sure your Mac meets the minimal system requirements set by QuickBooks.
- If necessary, update your Mac’s operating system to the newest version.
Solution 2: Check Disk Space and Permissions
Make sure you have enough disk space on your Mac to accommodate the QuickBooks migration failed unexpected operation. Run Disk Utility to examine and fix any disk permissions issues:
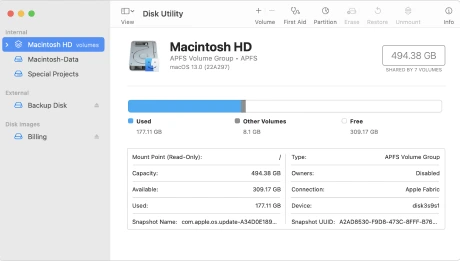
- You have to go to Applications, then go to Utilities, and then go to Disk Utility.
- Choose your Mac’s hard drive and then click on the “First Aid” tab.
- Allow the process to complete after clicking on “Repair Disk Permissions”.
- After completing the disk permissions repair you can retry the migration process.
Solution 3: Update QuickBooks and Mac
Make sure you are using the latest version of QuickBooks. If not, update it to the most latest release.
- Open QuickBooks and go to the “QuickBooks” menu.
- Choose “Check for Updates” and then follow the steps to install any available updates.
Check for updates to your Mac operating system:
- Click the Apple menu in the upper-left corner of your screen.
- Enter “System Preferences” > “Software Update.”
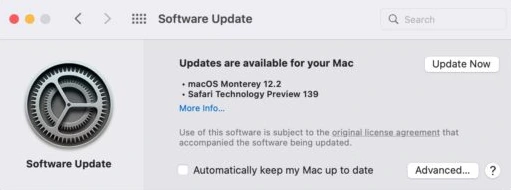
- Install any pending updates for your Mac.
Solution 4: Repair QuickBooks Installation
- You have to close QuickBooks if it is open.
- Then you have to open the “Applications” folder and locate the QuickBooks application.
- You have to press and hold the Control key and then you have to click on the QuickBooks application and then you have to choose Get Info.
- Unlock the QuickBooks Info box by clicking on the lock icon and entering your administrator password.
- Expand the “Sharing & Permissions”section to make sure you have “Read & Write” access.
- Close the QuickBooks information window.
- Reopen QuickBooks and retry the migration.
Solution 5: Create a New Company File
Create a new company file in QuickBooks.
- Open QuickBooks and choose “File” > “New Company.”
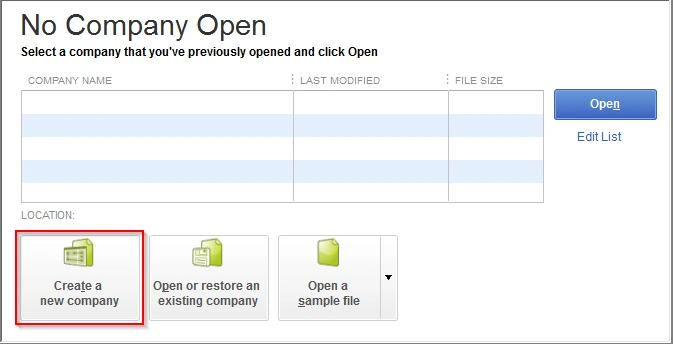
- Follow the prompts to create a new company file.
- Manually enter or import your information into the new company file.
Attempt the migration process with the new company file and see if the error remains.
Additional Method if You are Transferring Data from QBDT to QBO
Use the beanstalk method to migrate data from QBD to QBO
- Log in to the QuickBooks Desktop program, then select the company and proceed to the company screen.
- Now go to the bottom of the company screen. You can see the export option there (export company file to QuickBooks online).
- Next, log in to the cloud profile and create a QB online cloud profile if you do not have one already.
- Choose the destination where you want to migrate the company file. Next, log on to QB online accountant.
- Check the box “Yes, move my stock using FIFO, select the starting date” and select the date from which you want to migrate your data.
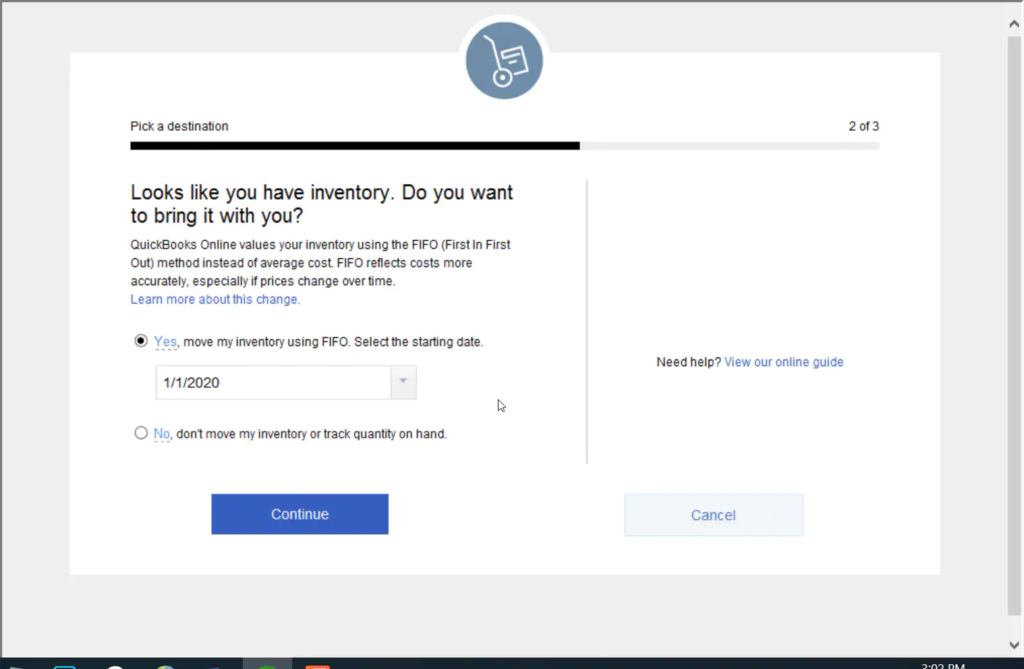
- Click continue to complete the process of migrating your company data to QuickBooks online.
Conclusion!
We believe that the steps given in this article were successful in fixing the “QuickBooks Migration Failed Unexpectedly” issue on Windows 11. If you continue to experience migration issues after implementing these steps, we recommend that you contact the QuickBooks Data Migration Team for specialist assistance.
Frequently Asked Questions (FAQs):
Q1. What does the error “QuickBooks Migration Failed Unexpectedly” mean?
This error typically occurs when you’re trying to migrate QuickBooks data from one computer or version to another, but something interrupts the process. It could be due to software conflicts, file corruption, or missing components needed for migration.
Q2. What are the common causes of the QuickBooks migration failure?
Common causes are:
- Corrupted or damaged QuickBooks company files.
- Incomplete or interrupted installation of QuickBooks.
- Missing or outdated Windows components (e.g., .NET Framework).
- Insufficient system resources.
- Network connectivity issues during migration.
Q3. What should I do if I am unable to move my QuickBooks data?
If the QuickBooks migration process fails often, we recommend that you do not attempt it on your own; instead, call competent experts and let them investigate and resolve the issue.
Q4. Can corrupted company files cause a QuickBooks conversion to fail?
Yes, corruption in your company files might cause migration issues. Before beginning a transfer, you must check that your company’s files are in good condition. If you suspect corruption, try running a verification and rebuild process in QuickBooks, or seek help from a QuickBooks specialist.
Q5. Will I lose any information if the QuickBooks conversion fails?
Generally, if the migration fails, your original data should remain on the source computer. However, to reduce the risk of data loss, it is always advisable to have a recent backup before beginning the migration.
Q6. How can I ensure a smooth movement of my QuickBooks data?
To guarantee a smooth move, follow these guidelines:
- Follow the instructions for using the QuickBooks Migration Tool, making sure it is the latest version available.
- You have to make sure that the source and destination computers meet the system requirements.
- Make a backup of your company’s files before starting the migration.
- Close all unnecessary programs during the migration to avoid problems.